


How to Do Easy Nail Art Designs at Home for Beginners
How to Make Easy Nail Art Designs without Professional Tools at Home for Beginners
If you've ever looked at nail art on the internet and thought to yourself, "I wish I could do that," fear not, you're not the only one. Nail art does seem daunting, but it is really something that you can learn with some tools and a little practice. This tutorial is all about easy nail art designs for beginners and will take you step by step through nail art at home. Needing to get prepared for a party or simply want to give yourself a break on weekends, do-it-yourself nail art is a great, calming, and inspiring activity that everyone can give a shot.
Why Try Nail Art at Home?
Not only is it cost-effective, but you get to keep your creativity. Some good reasons to try DIY nail art are:
-
It's cost-effective: No money spent and salon visits.
-
It's convenient: No driving and appointments to schedule.
-
It's personalized: You choose colors, patterns, and finishes.
-
It's calming: The experience can be therapeutic and fun.
-
It's creative: Let your imagination go wild with elaborate designs.
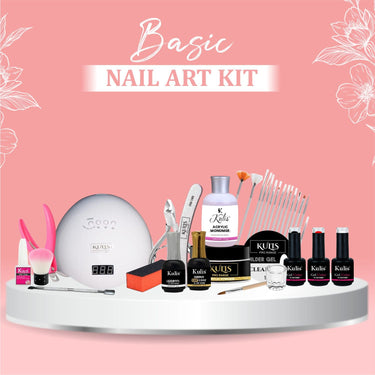
Tools You'll Need for Nail Art at Home
As a requirement, get these basic supplies. They're all affordable and beginner-friendly:
Nail polish (base color and colors of pattern)
-
Base coat and top coat
-
Dotting tools or bobby pins
-
Thin nail art brushes or old eyeliner brushes
-
Nail file and buffer
-
Nail polish remover and cotton swabs
-
Striping tape or plain tape
-
Makeup sponge (for gradients)
-
Stickers, gems, or decals (optional)
These are the only basics you'll need to create simple nail art designs for beginners at home.
Step by Step Nail Art at Home: 8 Beginner-Friendly Designs
We begin with some artistic but easy designs that you can learn in no time. Here's your step by step nail art at home tutorial:
1. Polka Dot Nails
Steps:
-
Application of base coat.
-
Paint the nails using nude or pale-colored nail paint.
-
Bobby pin or dotting tool dip into polish and tap.
-
Finish with top coat when dry.
-
Style is classic and easy to add on to any color scheme.
2. Tape Stripes
Steps:
-
Base color and let dry completely.
-
Tape strips diagonally or horizontally on nails.
-
Paint over second color.
-
Strip tape before dryness of polish.
-
Finishing top coat.
-
Nails appear neat and professional with minimal effort.
3. Glitter Gradient Tips
Steps:
-
Paint neutral base color on nails.
-
Glitter polish dot at tips with sponge.
-
Blend a little down to create fade.
-
Top coat to finish.
-
Instant new nail appearance!
4. Floral Nail Art
Steps:
-
Pastel on nails.
-
5-dot flower with dotting tool.
-
Contrasting dot center with dotting tool.
-
Clear coat to finish.
-
These floral designs are great for spring and not too hard for newbies.
5. Geometric Nail Art
Steps:
-
Nude or a pastel as base.
-
Triangles, stripes, or blocks with tape or small brush.
-
Color in contrasting color shapes.
-
Top coat.
-
Geometric shapes are fashionable and simple to achieve with a steady hand.
6. Ombre Nails
Steps:
-
Apply base color.
-
Put two colors of color on a make-up sponge.
-
Dampen onto nail lightly to blend.
-
Just keep doing it until desired gradient effect is achieved.
-
Clean out top and edge coat.
-
This look is stylish and can be created for any season.
7. Negative Space Designs
Steps:
-
Tape off areas of nail.
-
Paint on covered areas.
-
Slowly peel off.
-
Top coat for protection and gloss.
-
Negative space designs are fresh, plain, and immensely newbie-friendly.
8. Accent Nails
Instead of having all ten nails done with intricate designs, some are done with accessories and the rest have an equal coloring. It's quick but never out of fashion.
Long-Lasting Nail Art Tips
Half the deal is art-keeping it going is just as important. Here's how to extend the wear of your nail art:
-
Top coat and base coat are applied always.
-
No warm water for hours following polish.
-
Top coat will have to be replaced every 2–3 days.
-
Keep your cuticles and hands nicely moisturized.
-
Picking or peeling off polish is a big no-no.
-
Beautiful nails create your work look and shine longer.
-
Seasonal Nail Art Ideas
Here is how to match your DIY nail art to the seasons.
Spring
-
Pastel colors and floral designs.
-
Light gradations and baby pink.

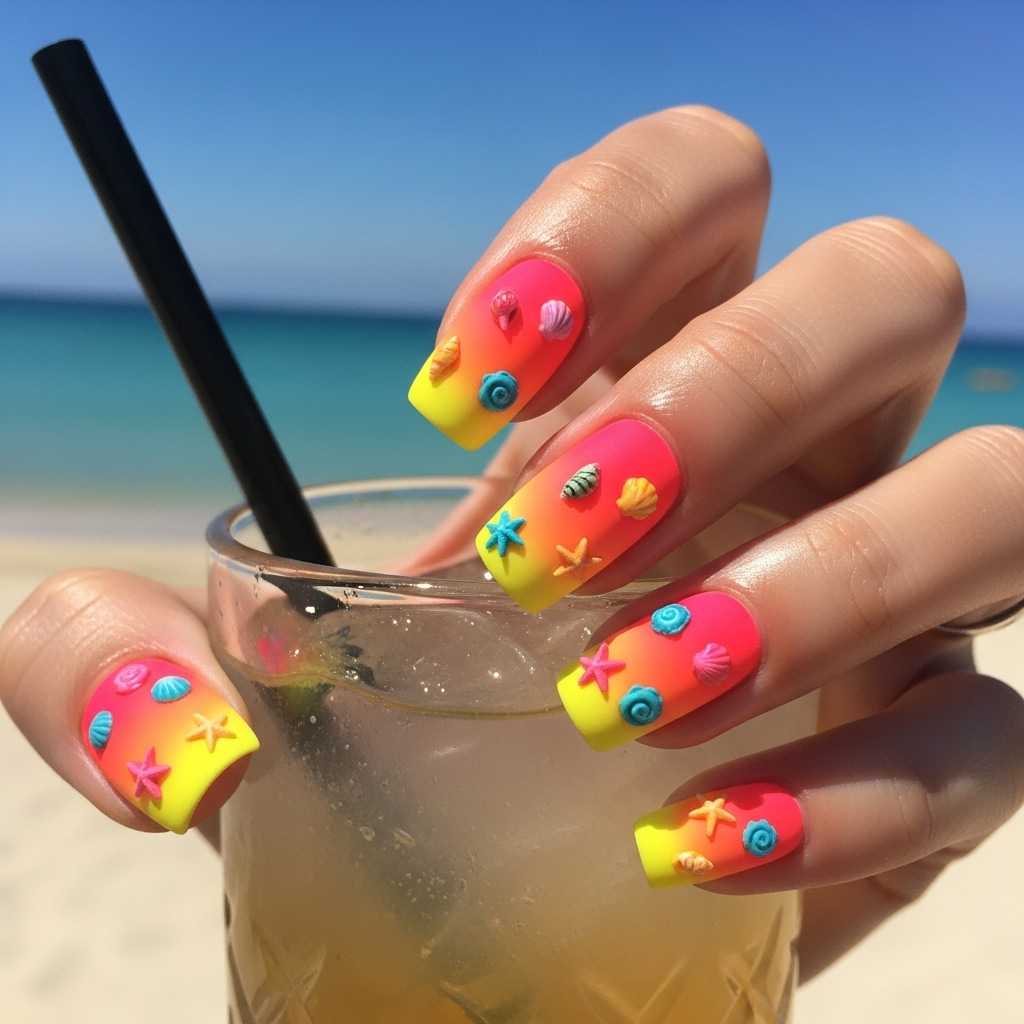
Summer
-
Neon colors and fruit prints like watermelon or citrus.
-
Wavy beachy designs like waves and seashells.
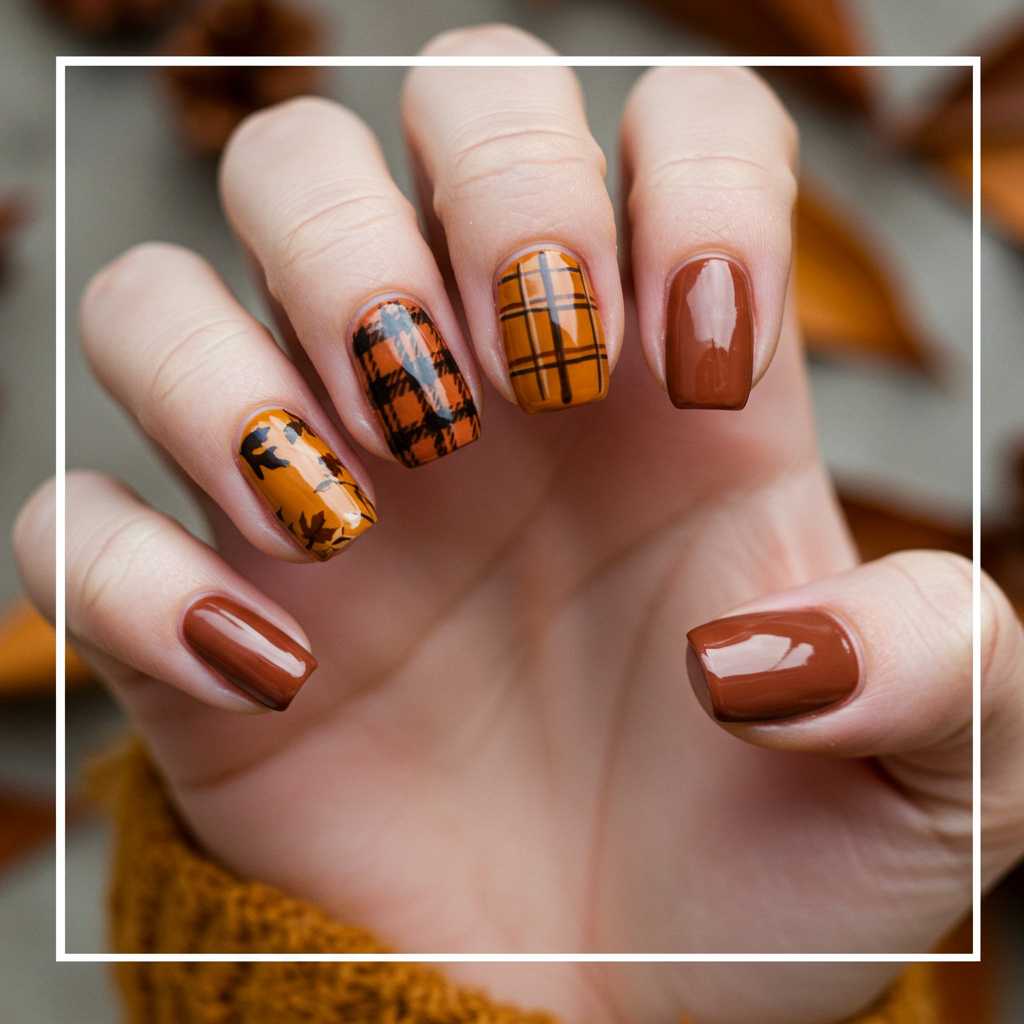
Fall
-
Warm dark colors like rust, terracotta, and mustard.
-
Leaf print designs, plaid designs, and flat sheens.
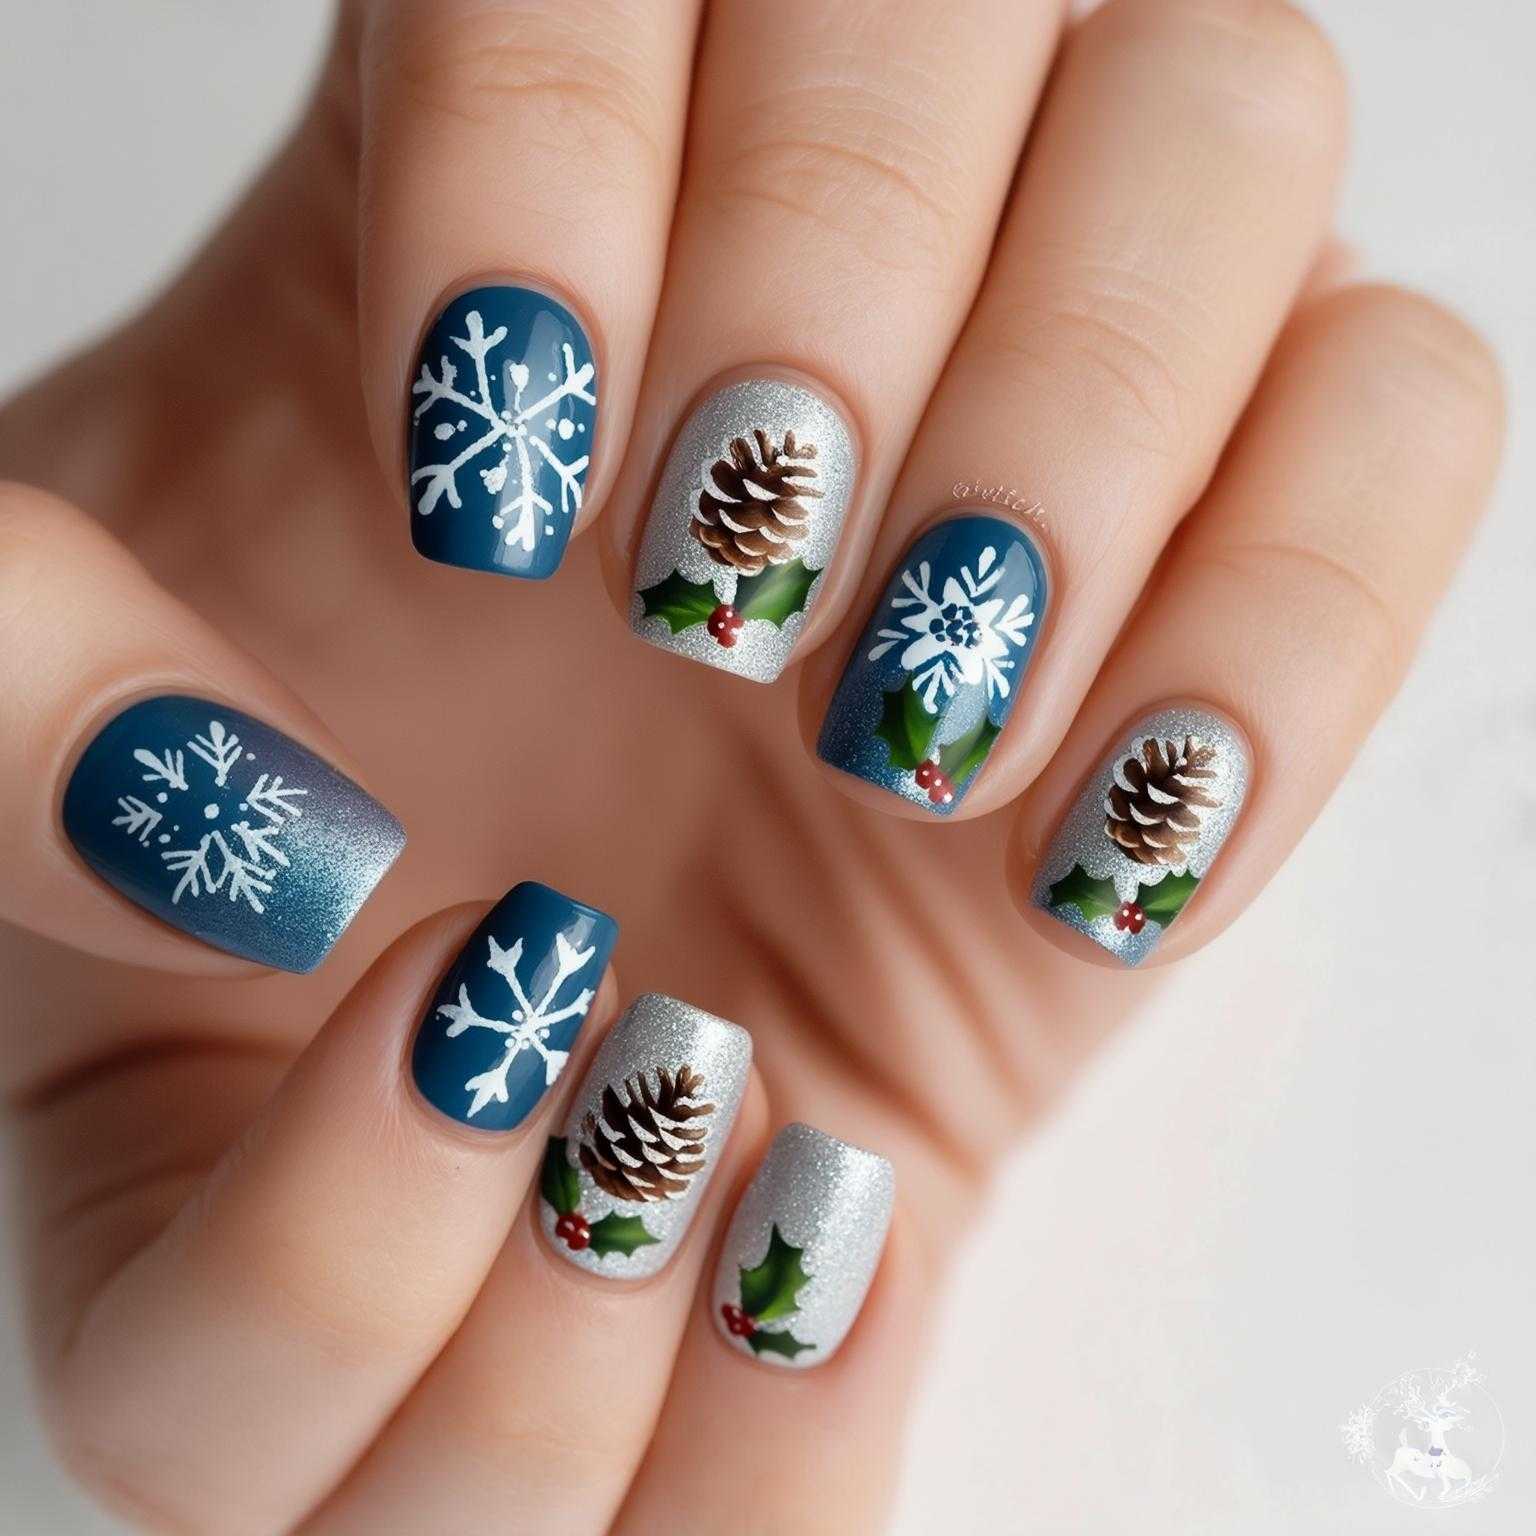
Winter
-
Cooler blue varieties of cool colors, silver, and white.
-
Snowflake designs, glitter tips, and metallic shine.
Remember this inspiration trying to do unique and stylish nail art at home step by step season-wise.
A Weekly Nail Art Routine Guide for Beginners:
In order to enhance the skills and keep the nails clean, attempt to adhere to a simple routine to be observed weekly:
Day 1: Soak nails, push back cuticles, trim nails.
Day 2: New polish, simple designs.
Day 3–5: Moisturizing, top coat.
Day 6–7: Old polish removal, night-time exposing of the nails.
This cycle is for the care of the nails and leaves you with space to work on at home nail art daily.
Where to Learn More and Get Inspired?
To proceed with your talent, go check out free or low-cost learning centers:
-
Pinterest: Search and pin images of easy nail art designs for beginners.
-
Instagram: Follow and look at tutorials and nail artists.
-
YouTube: Search "nail art at home step by step" tutorial.
-
Apps: Nail art design apps for visual practice and planning patterns.
Creating a "nail art mood board" is a great exercise that saves your best ideas in wait for your next DIY project.
Conclusion
You don't need to break the bank on fancy gear or professional guidance to be proficient at simple starter nail art. A little patience, plenty of creativity, and basic materials make everyone an expert at having their own nail art at home and sporting salon-finished nails.
From shimmer gradations to polka dots and geometric patterns, the world is your oyster. Learning to do nail art decoration step by step at home will only make you better at it, enable you to develop your own style, and give you a new pastime that is creative and rewarding.
Whether you are throwing a party or giving yourself a treat after a wild week, let your nails do the talking. It's cheap, it's fun, and it's definitely worth every cent!